


I was working hard on this tutorial all week and I'm so excited to share it with everyone! I wanted everyone to know how easy it really was to make your own Tree Decal for the walls in your home! I took a trip to my nearest Lowes and purchased wall paper. I wanted to make birch trees, so I purchased textured wallpaper to mimic the bark of that tree's look and feel.
Above, I digitally composed the pattern onto a wall to show you an idea of how the tree will look. Also, how they would look when painted (black). You can also frame parts of the pattern...You can flip the pattern over onto your wallpaper and get a mirrored image tree as shown above. Use different colors if you'd like to create depth. Use the extended tree height (later explained) to create different heights of trees.
Below, are images from dalidecals.com these decals can range from $50-$200 per decal. They are sooo beautiful but not everyone can afford to buy such items at such a steep cost...Let me show you how to make your own tree or wall decal. For a fraction of the cost. This is perfect for those who rent or do not want to commit to long term wall hangings. Instead of using wallpaper glue, you can use mounting putty or glue dots etc.

Things you will need:
- Textured/Embossed wall paper (paintable)
- You can also use contact paper
!
- Scissor
- X-Acto knife
- Water to soak your pattern in if not painted
- Wallpaper border adhesive (use this if you will be painting your tree)
- Printer with 8.5x11 inch paper
- Tape
- Pencil


First, download my FREE template pattern, use 8.5x11 inch printer paper. It is grayscale so it uses very little printer ink. When printing, make sure you hit "scale to fit" -this will shrink the image a bit but it ensures all parts are printed.

You can get an idea of how the pattern works.
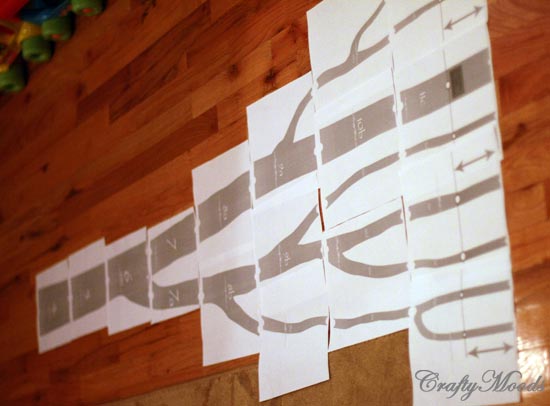
Make sure the semi-circles on the top and bottom of the page prints. The page might print with a white border around the pages. This is OK. Just line up the semi-circles and your pattern should be fine. Trim all excess white areas on the sides, bottom and top of the pages...

Should look like this after trimming...Notice all the white semi-circles forms a circle when taped together. Line em' up numerically. Page 1 is the bottom of the tree.

If your pages are missing the white semi-circles-don't worry. You should still be able to cut, paste together and form a fairly decent pattern. Just remember to measure your final put together tree to your ceiling height. Below, I did not need the top & bottom 5 inch extensions so I cut em' off.


This is the fabulous textured wallpaper. It is Paintable and Pre-Glued. I chose one that does not have a vertical or horizontal pattern. It is very scattered. This works best when doing decals for trees, leaves etc. --This roll was about $13 and it's 11 yards x 20.5 inches.

Tape all the pages together and lay flat onto your wallpaper. Secure with tape and trace with a pencil. Measure first to ensure that the height of your wall is the same as your pattern. Cut out.


Snipped branch...you can cut and paste the pattern since wallpaper is a scattered texture-. This is VERY forgiving. You can even add more branches if you like.

Since I printed a 'shrink to fit' tree the branches shrink about 1/8th inches on each side. That's fine also but you can be sloppy when tracing the pattern onto the wallpaper. Branches are irregular so it's not perfect.

Cut inside the lines with your Xacto knife or blade. Don't do this on your wood floors!

The pattern is 120 inches in height. Includes 5 inches extra on the top and 5 inches on the bottom. You can decide where you want the extra inches (top or bottom)...The pattern is for an 8 foot ceiling height (which is 96 inches). When printed, you will loose some overall inches but its OK. The pattern is long enough to compensate. Make sure the height matches before you tape to the wall. Use a measuring tape. Tape to the wall and make sure that it is STRAIGHT. (tree below is missing one tiny branch on the upper right.)

Use a plumb bob or a guide to ensure that the top left bark lines up with the bottom left bark or trunk. See the red guide below. Do a few marks on the wall with a pencil to save you straight placed tree.

With this pre-glued, textured wall paper, you have to soak it in water for about 15 seconds then apply it to the wall.
Note: If you want to paint your paintable wallpaper, you cannot not soak it. Since it's a cut out pattern, soaking it can get really messy because of the paint and ruin the entire project. You can outline your pattern on the rolled out paper, then paint, then cut out- or whatever works best for you. Use the below product or something similar to apply it to the wall. (image is from lowes.com)

I have too many bare walls in my home and this helps to take up some wall space instead of purchasing wall hangings...I'm so happy to share this with you, please feel free to share with anyone.
Here is a link for more info on how to REMOVE wallpaper if needed.
Feel free to leave me a comment or questions...
Enjoy!!
ohhhhhhhh Fancy!!!!!! I love this idea :-)
ReplyDeleteWow, these are really awesome! I'd love for you to submit this post to the M&T Spotlight: http://www.makeandtakes.com/spotlight
ReplyDeleteThanks Laurel, I will definitely submit it, thank you!!!
ReplyDeleteGreat detailed post Trish!
ReplyDeleteHi,
ReplyDeleteThis is just what I was looking for! Love it!
But I'm sooo sad I can't download :( I need it for this Friday!Please! is this anyway you can email it to me! ecardona3@optimum.net THANK YOU! : )
Laurel this is beautiful and easy, thank you for sharing! I will complement this idea with a few inexpensive wood pegs painted the same color as the tree for hanging coats.
ReplyDeleteThis is a wonderful craft that combines technology and home decor DIY. I love the brooding activity for the weekend on this one.
ReplyDeleteThis is perfect. Took me a few hours to gather materials, prep, and start hanging. I have 11+ foot vaulted ceilings so I used my imagination to extend the base and the branches. Awesome template! Thank you!
ReplyDeleteThanks Molly--please send me a pic!!! I would LOVE to see it. Trish@craftymoods.com
DeleteI know this might sound like a dumb question but I've never worked with wall paper or decals or anything besides paint, so how would you remove this from the wall when needed?
ReplyDeleteHey there,
DeleteAwesome question. There are wallpaper removers available at home improvement stores. Here is a link if you need more info. Thanks for the comment!
http://www.hgtv.com/decorating/how-to-remove-wallpaper-patience-is-a-virtue/index.html
wow!! Great job!The tree wall decal looks amazing.Awesome idea.Thanks for sharing and keep posting for more.
ReplyDelete-http://www.WiseDecor.com
The link to the pattern doesn't work :( Please help. I love this idea!
ReplyDelete